ap.setup Wavlink Web Wizard Setup
Access ap.setup smoothly with Wavlink setup support. We install & optimize WiFi extenders via ap.setup to extend your WiFi to dead zones, improving signal quality, or simply giving your home better internet coverage. Get your Wavlink equipment configured from our experts to experience lightening speed internet. Explore the complete ap.setup guide on this page to learn how to access this web-interface, configure WiFi networking device and modify settings using the dashboard. In case you get stuck, don’t hesitate to avail our professional services.
Introduction to ap.setup Wavlink
Have you noticed “ap.setup” pop up in your user manual or on the product box. This isn’t just any random website—ap setup is the local web address you’ll use to configure your Wavlink device. Think of it as the control panel for your extender.
When you access ap setup through your browser, you’ll unlock the Wavlink Web Wizard Setup—a super handy interface that walks you through the configuration process.
How to access ap.setup?
Before You Begin: What You’ll Need
Before accessing the ap.setup Wavlink login web-interface, make sure you’ve got the following ready:
- A Wavlink range extender (obviously).
- A phone, tablet, or laptop with WiFi capability.
- Your main router’s SSID (network name) and password.
- A power outlet nearby.
Optional but useful: A paperclip (you’ll need this if you ever have to reset the device).
Step-by-Step Guide to Wavlink Web Wizard Setup via ap.setup
Step 1: Plug in Your Wavlink Extender
Find a good spot between your router and the area with weak WiFi. Plug in your Wavlink extender and wait for the power LED to turn solid. This usually takes 30-60 seconds. You’ll see the Wavlink LED indicators begin to blink—this means the extender is booting up.
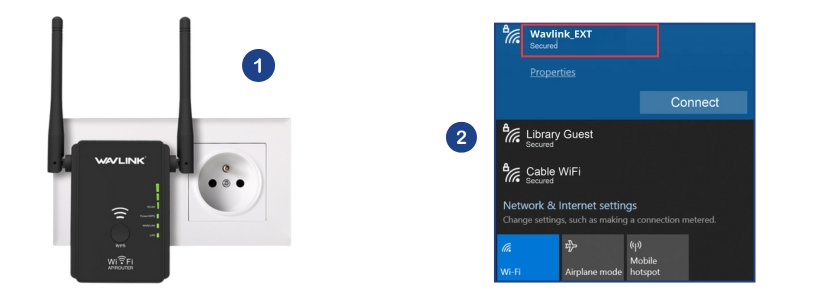
Step 2: Connect to the Wavlink Network
On your phone or laptop, open WiFi settings and look for a new network. Connect to this open network. There’s no password needed at this point.
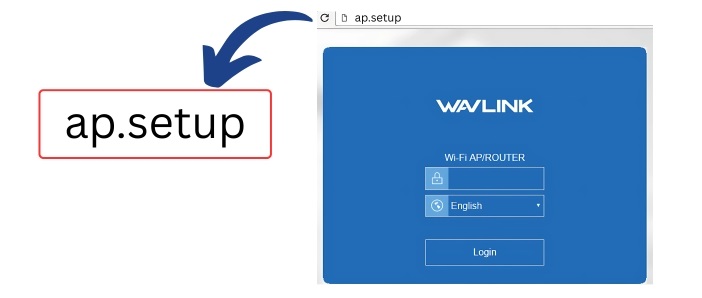
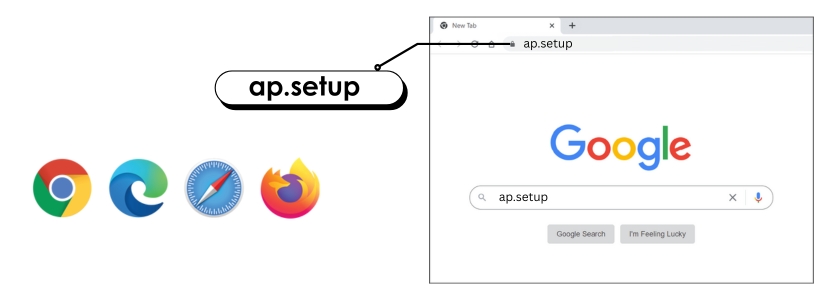
Step 3: Open a Browser and Type ap.setup
Now, open any browser (Chrome, Safari, Firefox, etc.) and in the address bar, type: ap.setup. Hit enter. If that fails, use the IP address: 192.168.10.1
Step 4: Wavlink Web Wizard
Once you’re in, you’ll be greeted by the Wavlink Web Wizard. This is where you can access the complete dashboard & modify settings.
- Choose Repeater Mode – This is what you want if you’re trying to extend your existing WiFi.
- Scan for WiFi Networks – The extender will now scan for nearby networks.
- Select Your Router’s SSID – Pick your home WiFi network from the list.
- Enter Your WiFi Password – This connects the extender to your main network.
- Set a Name for Your Extended Network – You can keep it the same as your original network or add “_EXT” for clarity.
Wait a minute or two after clicking “Apply” or “Save.”
Step 5: Testing Time
Once the setup completes, your Wavlink extender will reboot. Go back to your device’s WiFi settings and connect to the new extended network.
You should now have stronger WiFi signals in areas that used to be dead zones.
Troubleshooting Tips: If ap.setup Wavlink Doesn’t Work
In this section, we have mentioned snags that you might encounter while accessing the wavlink web interface, and also shared recommended course of action to fix them.
- Can’t Access ap setup? Try using a different browser or device. Or type in 192.168.10.1.
- Page Doesn’t Load? Ensure you’re connected to the Wavlink extender’s WiFi.
- Forgot the Password? Use a pin to press the reset button (usually for 10 seconds) and start fresh.
- Still No Internet? Make sure you entered your main router’s WiFi password correctly during setup.
Why Use wavlink ap setup Over the WPS Method?
Some Wavlink extenders support WPS (WiFi Protected Setup), which lets you connect by pushing WPS buttons. While that’s faster, using ap.setup Wavlink gives you full control—you can rename networks, see connected devices, and even tweak security settings.
Plus, not all routers have a WPS button, so using the wavlink ap router setup is more universally compatible.
Placement of Extender is Crucial
A lot of people plug the extender in some random corner and expect miracles. That’s not how WiFi works.
Here’s a tip: place your extender halfway between your router and the area with weak signal. If it’s too far from the router, it won’t get a strong signal to repeat. If it’s too close, it won’t help your dead zones.
Aim for a spot where you can still get two or three signal bars from your main WiFi.
Setting up your Wavlink extender through ap.setup isn’t very complicated; our expert user-guide elaborates each step to make the process simplified & understandable. Wavlink Setup makes things simple, giving you insights to learn how to access ap.setup after connecting the WiFi networking device.
Whether you’re setting this up in your apartment, office, or basement, our technicians promise you a reliable and ultra-fast WiFi – offering the perfect setup environments. If your extender is down, and does not support seamless streaming and smoother video calls, remember Wavlink setup support is just a call away. Don’t waste time, but haste to connect with our experts to setup things right for you.